React Native is a great framework to develop mobile apps for iOS and Android with the help of JavaScript. However, at some point of your project you might need to call native functions. In React Native, invoking a native function is called bridging. In this article, I will explain how to implement a bridge communication between Java and JavaScript for your React Native based Android app.
1. Create a new react-native project or open an existing one
To create a new react-native project, open your terminal and enter the following command:
react-native init HelloWorld
This will create a new react-native app called HelloWorld with the corresponding android/ and ios/ folders containing your mobile app’s codes for the different platforms.
2. Open the project on Android Studio
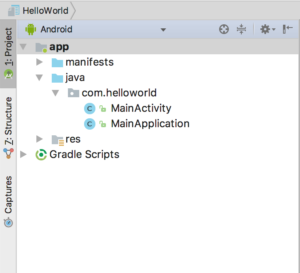
Launch Android Studio and select File -> New -> Import Project… then select the HelloWorld/android folder to import to Android Studio. Your Android Studio Project window should look like this :

3. Create a new Java module
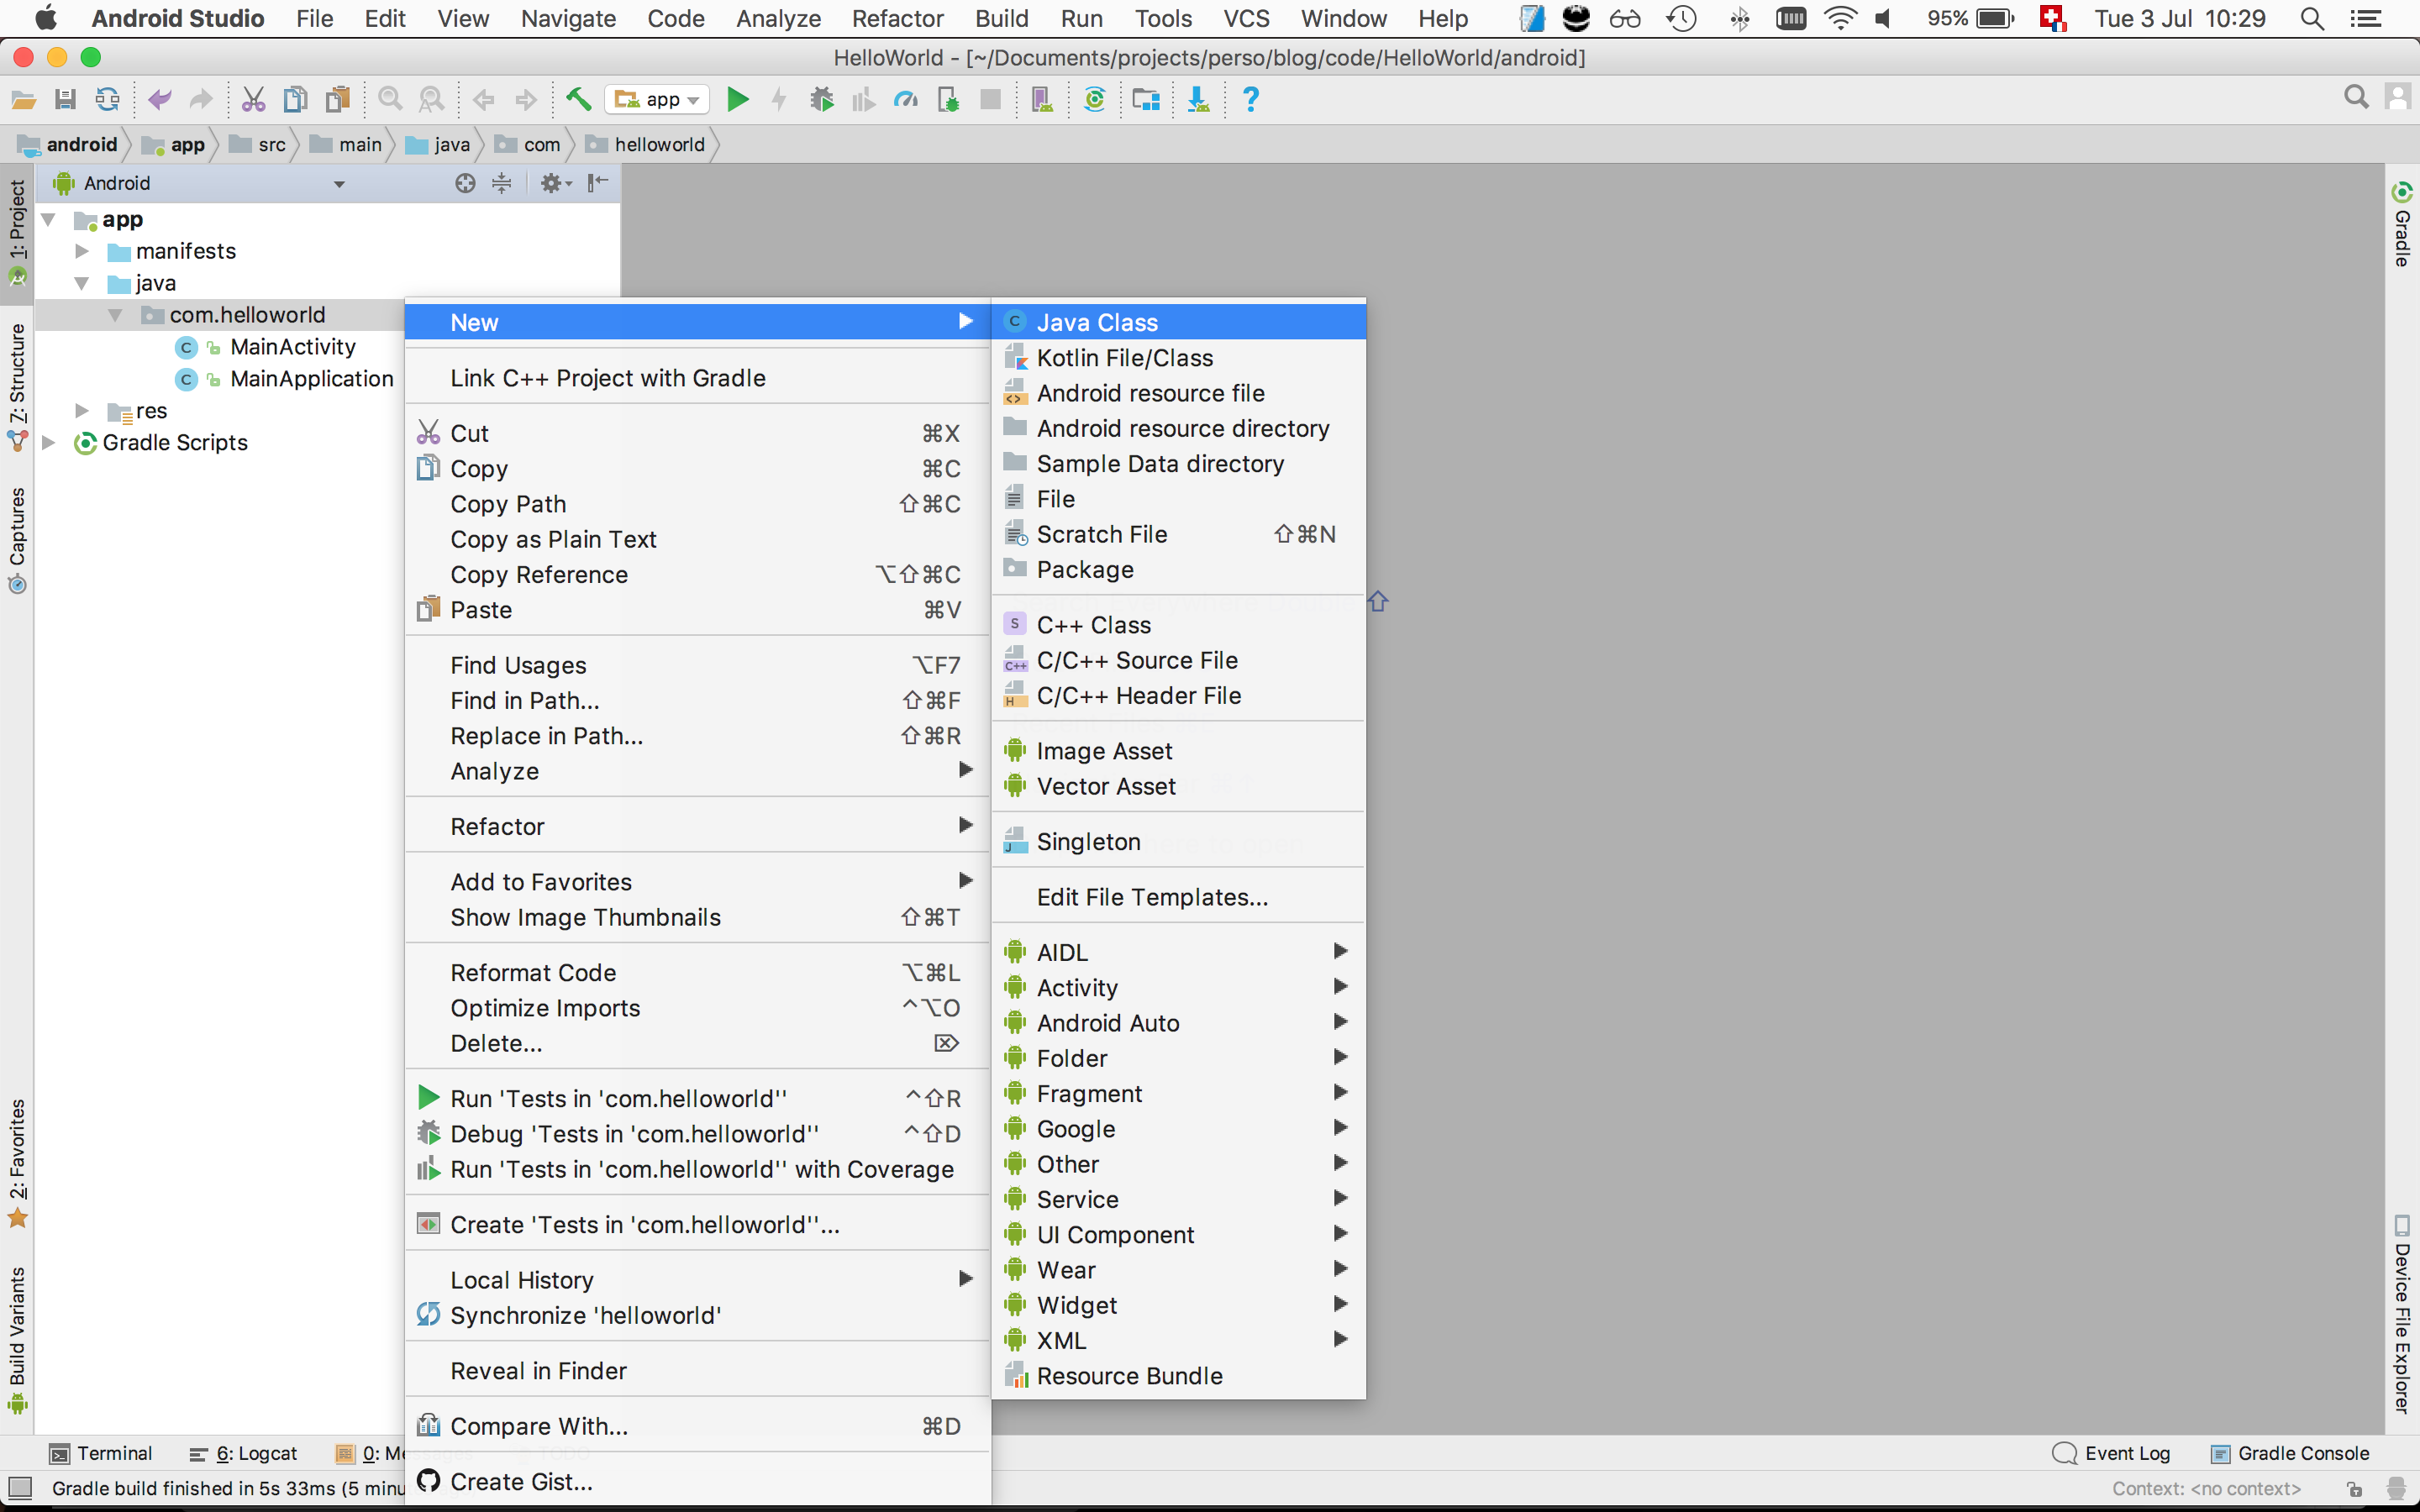
The first step to be able to use Java native code from react-native is to create a new Java module that extends the ReactContextBaseJavaModule class. To do so on the 1:Project pane of Android Studio right click on the com.helloworld folder and select New -> Java Class as shown below.

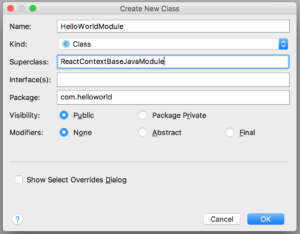
In the new window enter the following information and click OK:

Important note: in this tutorial, we will be using a callback so that your Java function can send some parameters back to JavaScript. Alternatively, one could also use a Promise (see here) or nothing at all if the main point is just to call a Java class without information going back and forth.
The newly create HelloWorldModule.java will open. You can remove the content of the file and add the following code:
package com.helloworld;

import com.facebook.react.bridge.ReactApplicationContext;
import com.facebook.react.bridge.ReactContextBaseJavaModule;
import com.facebook.react.bridge.Callback;
import com.facebook.react.bridge.ReactMethod;
import com.facebook.react.uimanager.IllegalViewOperationException;

public class HelloWorldModule extends ReactContextBaseJavaModule {

    public HelloWorldModule(ReactApplicationContext reactContext) {
        super(reactContext); //required by React Native
    }

    @Override
    //getName is required to define the name of the module represented in JavaScript
    public String getName() {
        return "HelloWorld";
    }

    @ReactMethod
    public void sayHi(Callback errorCallback, Callback successCallback) {
        try {
            System.out.println("Greetings from Java");
            successCallback.invoke("Callback : Greetings from Java");
        } catch (IllegalViewOperationException e) {
            errorCallback.invoke(e.getMessage());
        }
    }
}
4. Register the new Java module
Once your module is implemented, you need to register it. For the registration, you will need to create a new package. Create a new Java Class as you did earlier and call it HelloWorldPackage. Copy and paste the following code to your HelloWorldPackage.java file.
package com.helloworld;

import com.facebook.react.ReactPackage;
import com.facebook.react.bridge.NativeModule;
import com.facebook.react.bridge.ReactApplicationContext;
import com.facebook.react.uimanager.ViewManager;
import com.helloworld.HelloWorldModule;

import java.util.ArrayList;
import java.util.Collections;
import java.util.List;

public class HelloWorldPackage implements ReactPackage {

    @Override
    public List<ViewManager> createViewManagers(ReactApplicationContext reactContext) {
        return Collections.emptyList();
    }

    @Override
    public List<NativeModule> createNativeModules(
            ReactApplicationContext reactContext) {
        List<NativeModule> modules = new ArrayList<>();
        //this is where you register the module
        modules.add(new HelloWorldModule(reactContext));
        return modules;
    }
}
5. Register the new Java package
Finally, you need to properly register the new package. Open the MainApplication.java and modify it as follow
package com.helloworld;

import android.app.Application;

import com.facebook.react.ReactApplication;
import com.facebook.react.ReactNativeHost;
import com.facebook.react.ReactPackage;
import com.facebook.react.shell.MainReactPackage;
import com.facebook.soloader.SoLoader;

import java.util.Arrays;
import java.util.List;

public class MainApplication extends Application implements ReactApplication {

  private final ReactNativeHost mReactNativeHost = new ReactNativeHost(this) {
    @Override
    public boolean getUseDeveloperSupport() {
      return BuildConfig.DEBUG;
    }

    @Override
    protected List<ReactPackage> getPackages() {
      return Arrays.<ReactPackage>asList(
          new MainReactPackage(),
          new HelloWorldPackage()
      );
    }

    @Override
    protected String getJSMainModuleName() {
      return "index";
    }
  };

  @Override
  public ReactNativeHost getReactNativeHost() {
    return mReactNativeHost;
  }

  @Override
  public void onCreate() {
    super.onCreate();
    SoLoader.init(this, /* native exopackage */ false);
  }
}
We are simply adding the new HelloWorldPackage() code at line 26, the rest is unchanged.
6. Edit JavaScript code
It is now time to implement the JavaScript side of the app. We will create a simple TouchableOpacity element and call the native Java function on press of this element. Open the HelloWorld/App.js file with your favorite text editor and change it as below:
/**
 * Sample React Native App
 * https://github.com/facebook/react-native
 * @flow
 */

import React, { Component } from 'react';
import {
  Platform,
  StyleSheet,
  Text,
  TouchableOpacity,
  View
} from 'react-native';

// We are importing the native Java module here
import {NativeModules} from 'react-native';
var HelloWorld = NativeModules.HelloWorld;

type Props = {};
export default class App extends Component<Props> {

  // async function to call the Java native method
  async sayHiFromJava() {
    HelloWorld.sayHi( (err) => {console.log(err)}, (msg) => {console.log(msg)} );
  }

  render() {
    return (
      <View style={styles.container}>
        <TouchableOpacity onPress={ this.sayHiFromJava }>
              <Text>Invoke native Java code</Text>
         </TouchableOpacity>
      </View>
    );
  }
}

const styles = StyleSheet.create({
  container: {
    flex: 1,
    justifyContent: 'center',
    alignItems: 'center',
    backgroundColor: '#F5FCFF',
  }
});
7. Start the Android Virtual Device and run the app
On Android Studio click the small AVD manager icon (![]() ) and start (or create a new one if you don’t have any existing one) your AVD. Then on your terminal enter the following command:
) and start (or create a new one if you don’t have any existing one) your AVD. Then on your terminal enter the following command:
react-native run-android
You should see the following on your Android emulator

8. Invoke the sayHi() Java function from JavaScript
Open the 6:Logcat window of Android Studio to see the Logs and press the “Invoke native java code” button in the emulator. This action will call the native Java function and should indicate the following output in your logs:

I hope this tutorial was clear, let me know how it went for you in the comments😊
Sources:
https://facebook.github.io/react-native/docs/native-modules-android
https://blog.botreetechnologies.com/how-to-build-a-react-native-android-bridge-4166e114a990
https://www.dailydrip.com/topics/react-native/drips/using-android-native-modules.html
We can work together

Share this post on social media:
Hi, I’m getting below warning and not getting the required output as you have explained above,
YellowBox.js:67 Possible Unhandled Promise Rejection (id: 8):
TypeError: Cannot read property ‘sayHi’ of undefined
TypeError: Cannot read property ‘sayHi’ of undefined
at _callee$ (blob:http://localhost:8081/91f28d28-9d6a-4880-b74a-1f2fa92730e1:1889:28)
at tryCatch (blob:http://localhost:8081/91f28d28-9d6a-4880-b74a-1f2fa92730e1:41535:19)
at Generator.invoke [as _invoke] (blob:http://localhost:8081/91f28d28-9d6a-4880-b74a-1f2fa92730e1:41710:24)
at Generator.prototype. [as next] (blob:http://localhost:8081/91f28d28-9d6a-4880-b74a-1f2fa92730e1:41578:23)
at tryCatch (blob:http://localhost:8081/91f28d28-9d6a-4880-b74a-1f2fa92730e1:41535:19)
at invoke (blob:http://localhost:8081/91f28d28-9d6a-4880-b74a-1f2fa92730e1:41611:22)
at blob:http://localhost:8081/91f28d28-9d6a-4880-b74a-1f2fa92730e1:41641:13
at tryCallTwo (blob:http://localhost:8081/91f28d28-9d6a-4880-b74a-1f2fa92730e1:45260:7)
at doResolve (blob:http://localhost:8081/91f28d28-9d6a-4880-b74a-1f2fa92730e1:45424:15)
at new Promise (blob:http://localhost:8081/91f28d28-9d6a-4880-b74a-1f2fa92730e1:45283:5)
Please reply soon.
Sorry Mayur for the late reply. Did you solve your issue?
Same here. Please have a look soon. Thank you.
Fixed it. Forgot to replace the return value in getName() with the name of my module.
Hey Jr how did you fixed it? I am facing the same error as you
I think Jr is talking about L18 in the HelloWorldModule.java file. That’s where you have to define the name for your Module.
Could you help me about error message: TypeError: null is not an object (evaluating “HelloWorlsd.sayHi”)
can ypu please share the latest code
The code in the article should still work, let me know if you are stuck!
A really nice tutorial to follow and create Bridge file for Android side of RN. Thanks for sharing the knowledge.
Thank you Akshay, happy to hear it was helpful!
please, could you help me to fix this error as soon as possible. I’m getting an error about TypeError: null is not an object (evaluating ‘HelloWorld.sayHi’). I done base on the follow this article.
Hi, did you name all the files and functions correctly (as indicated in the blogpost)?
got the same error could you please verify
Can you please share your source code? My emulator keeps crashing, even though the code compiles with no errors.
I don’t have any of this code in a repo but it’s all in the article!
TypeError: null is not an object (evaluating ‘HelloWorld.sayHi’)
i’m facing this issue how to solve this problem please help
Did you use another name for the function? If yes you should replace sayHi by the new name