Hiring developers is often presented as a question of evaluation.
How good is the coding challenge? Are the interview questions sharp enough? Does the culture interview really catch red flags?
After hiring many developers, I’ve learned something different:
Evaluation is not the hard part. Operations are.
What breaks hiring processes at scale is rarely judgment. It’s friction. And friction quietly eats time, attention, and energy.
This is a reflection on how I run our hiring pipeline and how a small, unsexy system removed more pain than any interview framework ever did.
The hiring process we use at Relai
For developer roles (mobile, front-end, back-end), our process is deliberately simple and consistent:
Our HR screens CVs
First quick call with HR
A short culture call with me
A coding challenge (using codility)
A technical interview with the tech lead and the team
A final call with our CEO
This process works well. We’ve iterated on it, and the signal is good.
But when you run this flow for hundreds of candidates, something else emerges.
The structure isn’t the bottleneck. Running it smoothly is.
Where things start to break
Hiring doesn’t fail loudly. It degrades quietly.
A delayed email here. A slightly unclear instruction there. A candidate who shows up unprepared not because they’re bad, but because expectations weren’t crystal clear…
Most of the friction lives in places people rarely talk about:
coordination
scheduling
repetitive communication
small wording differences that create big misunderstandings
And nowhere was this more obvious than in the technical interview invitation.
The hardest email to send: the technical interview invitation
The technical interview is the most fragile step in our process.
It involves:
multiple engineers
a senior candidate
a precise agenda
and very little room for ambiguity
If this email is unclear, the interview suffers before it even starts.
This is the email I send candidates at that stage (simplified):
Hi $candidate_name,
Thanks for your answer! I just sent you a calendar invite.
We would like to invite you for the 2nd round of interview with 2 of my back-end developers for a 1 hour call, roughly split as follows:
– 20 minutes: presentation from you about a project you worked on and are excited to share (learnings, failures, successes). You can use any material you want (slides, PDF…). – 10 minutes: questions from the Relai team about that project. – 30 minutes: discussion with the Relai team about various Golang topics and the coding challenge.
Looking forward to it
It looks simple.
It isn’t.
Each line matters:
the agenda sets expectations,
the time split reassures the candidate,
the presentation framing signals what kind of engineer we value,
mentioning the coding challenge avoids surprises.
Now imagine writing this correctly hundreds of times, across roles, teams, and time zones.
Why “just having templates” wasn’t enough
Like most people, I tried the obvious solutions first:
old sent emails,
drafts in Gmail,
snippets in Notion,
copy-paste from previous candidates.
All of them failed in the same way.
They added friction at the moment of use.
I had to:
search for the right version,
context-switch,
re-read everything to make sure nothing was missing,
slightly rewrite things “just this once”
Individually, these are tiny costs. Collectively, they create fatigue.
And hiring is already a decision-heavy activity. Anything that drains attention makes judgment worse.
Turning a fragile email into a system
At some point, I stopped treating this as “just an email”.
I treated it as a system.
I broke it down into:
a fixed structure (agenda, tone, expectations),
a few variables (candidate name, role, date, tech stack),
and a way to insert it instantly, wherever I was working.
Not because I needed templates. But because I needed zero friction.
When the snippet is one shortcut away:
the wording stays consistent,
nothing important gets dropped,
and my brain stays focused on evaluating the candidate, not rewriting logistics.
The technical interview invitation snippet on ClipDeck
The unexpected benefit: better interviews
Once this email became consistent, something interesting happened.
Candidates showed up better prepared. Interviews felt calmer and more focused. Engineers knew exactly what to expect. Follow-up questions dropped significantly.
We didn’t change the interview itself.
We removed ambiguity before it started.
That’s a pattern I’ve seen again and again: small operational systems often unlock more leverage than big conceptual changes.
A broader lesson
Hiring is ultimately about judgment.
But judgment requires:
clarity,
energy,
and mental space.
Every repetitive task that steals attention makes judgment worse.
Over time, I’ve learned to be ruthless about these small frictions. Not because they’re exciting but because they compound.
ClipDeck started as a tool I built for myself to reduce that friction. It quietly sits in the background, doing the boring work consistently.
The following tutorial applies to a Raspberry Pi 4 running Ubuntu server, check this page to read more about Ubuntu server on RPi. We are going to build the ela and ela-cli binaries to run them on the RPi, for more information you can check the official GitHub repository of the Elastos node. Let’s start by building the binaries. Run the following commands on your RPi once connected to it (via SSH or direct access).
Again, don’t forget to replace $PASSWORD by your own password you used above. And that’s it!
Congrats, you just started running an Elastos full node on your Raspberry Pi 😉 You can now use the REST API or JSON RPC to get more information about your node👍
Stay tuned for more Elastos on RPi related content. If you are interested in the topic, I am also building the Elabox, a plug-and-play hardware to run several Elastos services without any effort.
I was planning this blogpost since quite some time, and I thought now was the perfect time as some people were asking about it on Twitter. Stripe is a great platform to accept payments for your project. However, there is not official React Native library (they released a React library recently tho). Some people mentioned using Tipsi (https://github.com/tipsi/tipsi-stripe) but it hasn’t been updated for a while and is not an official library. Today, we are going to create a UI in React Native and use the official Stripe iOS SDK to accept payments in our mobile app. We will have to deal with some JavaScript and a tiny bit of Objective-C (no worries, just a tiny bit). Let’s get started!
The fist thing to do (if you haven’t already) is to have a Stripe account and create a new project. Then, go to the Developer > API keys settings and save your private and secret key somewhere, we are going to use them later. For our payment system to work we also need a back-end and we will use ExpressJS to implement a simple REST API. Without further ado, let’s do it 👍
1. Create a new React Native project
Skip this step if you already have a RN project. I will create a new one especially for this tutorial, so that we can also refer to it with its name. Open your command line tool and run:
npx react-native init StripeRN
cd StripeRN
2. Install Stripe iOS SDK
The Stripe iOS SDK is distributed via cocoapods, to install it open the ios/Podfile file and add the following line in the list of Pods:
pod 'Stripe'
Close the file and run the following commands on your command line:
cd ios
pod install
We now installed Stripe in our RN project 👌
3. Configure Stripe SDK
To configure the Stripe SDK we need to instantiate it via the AppDelegate.m file, to do so open the Xcode project ios/StripeRN.xcworkspace
and add the following line to your AppDelegate.m file:
1 – at the top of the file
#import <Stripe/Stripe.h>
2 – and the following lines just before the return YES; statement
self.rootViewController = rootViewController;
[Stripe setDefaultPublishableKey:@"pk_test_XXXXXXXXXX"]; // use your own pk_test Stripe key here
3 – don’t forget to update the pk_test key to your own.
Your AppDelegate.m file should look like below:
In addition add the following line to AppDelegate.h just before the @end statement
If you are wondering why we need to declare the rootView UIViewController it’s to support the 3D Secure system. To read more about the 3D Secure system you can check the official Stripe documentation about authentication using 3D Secure.
4. Create an empty UIViewController for 3D Secure
To accept cards with the 3D Secure system we need to create a new UIViewController to take control of the validation flow. To do so create a new CheckoutViewController.m and CheckoutViewController.h files in XCode and add the following code:
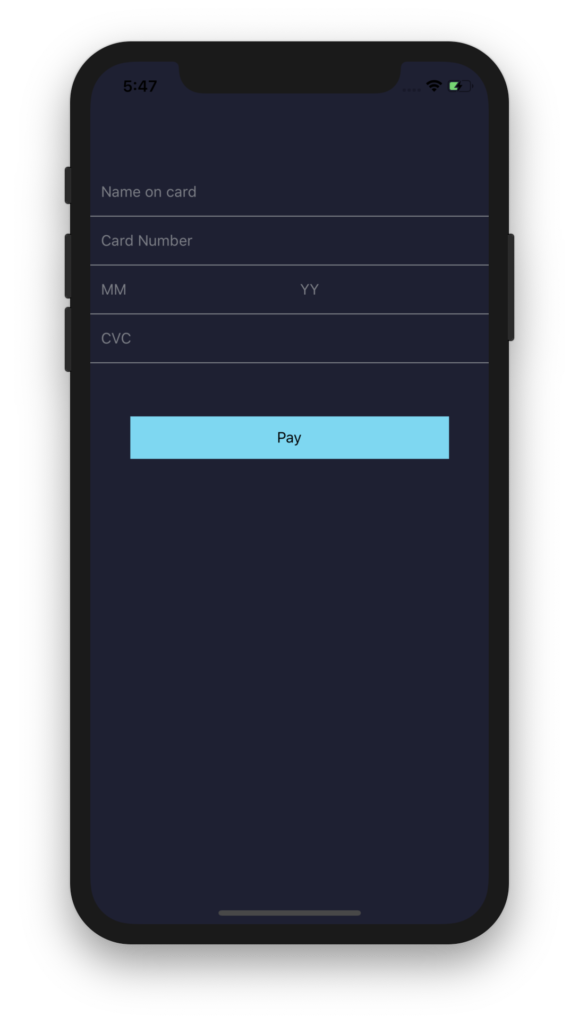
5. Create the payment UI in React Native
We are going to create a simple UI to grab all the required information to process card payment. Open your App.js file and copy paste the following code to it:
5. Create Native Module to access the Stripe SDK from our React Native code
To be able to access the Stripe SDK from React Native we need to create a Native Module. To do so create a new StripeBridge.m and StripeBridge.h files in XCode and update their content to:
We created our StripeBridge Native Module and can access it via React Native by pressing the Pay button. The Native Module only contains one single function to accept payment. You can check the Stripe iOS SDK documentation for more parameters and customization. The idea is to pass the information we collected from the user in our React Native UI (JavaScript) to the iOS SDK via a bridge. The StripeBridge can then process the information received to finalize a payment (or call the 3D secure view if needed). Some simple conversions are required for the month and year (L12 and L13) values as they are passed as NSString and need to be converted to NSNumber.
6. Create a nodeJS back-end to take care of PaymentIntents
To be able to succesfully charge a customer you need to create a back-end solution to generate a PaymentIntent. Stripe requires a PaymentIntent in addition to the credit card information to validate a payment. For that purpose we will create a simple ExpressJS back-end following one of my previous blogpost: Creating a simple back-end with ExpressJS
Once done, we need to install the stripe package, run
yarn add stripe
We then need to update the index.js file and add an endpoint to return a PaymentIntent to our mobile app. Update your index.js as follow:
Don’t forget to update the stripe_sk on L24 to your own secret key and the amount you want to collect on L30. Every time the mobile app will connect to the /createStripePaymentIntent endpoint a new PaymentIntent will be returned. The PaymentIntent in addition to the credit card information will be used by the iOS SDK to confirm a payment.
6. Run the app
To test our code we need to run the app, open your terminal and run
react-native start
On Xcode, choose your simulator and press Run. You should see your app running 😍
Well done! You can now try the integration with a list of test cards provided by Stripe and see how the app reacts to different scenarios
Don’t hesitate to share if you enjoyed this tutorial 😎
Today’s topic is ExpressJS, a web framework for NodeJS. You can use ExpressJS if you need any back-end program, for example for a web-app or a REST API. In this article, I will take you through the installation of ExpressJS and the creation of a very simple project.
1. Creating an empty nodeJS project
Let’s start with the installation. Open your terminal and create a new directory:
mkdir back-end
cd back-end
We then need to initialize a new node project, we will use the yarn package manager (you can also use npm of course)
yarn init
Answer the questions to finalize the initialization of the node project. You will see a new package.json file in your directory, that’s a good sign!
2. Installing the required packages
Now, let’s install the libraries we need:
nodemon: to help us automatically refresh and restart the server on any file change, very helpful to avoid stopping and restarting the server manually every time!
cors: to provide the required Middleware for Express to allow the CORS mechanism (to put in simple words: cors allows the communication between different servers)
body-parser: middleware to parse the request body object and give access to it via req.body
Run the following commands to install all the packages:
yarn global add nodemon
yarn add express
yarn add cors
yarn add body-parser
yarn add morgan
Next, we will create the index.js file that will be called on npm start.
3. Implementing index.js
Run the following command on your terminal to create an empty index.js file
touch index.js
Add the following code to your index.js file (I have added more information as comments in the code)
// import all the required packages
const express = require("express");
const app = express();
const cors = require("cors");
const bodyParser = require("body-parser");
const logger = require("morgan");
// define port number
const port = process.env.PORT || 3001;

// instantiate express with the correct parameters
app.use(logger('dev'));
app.use(cors());
app.use(bodyParser.urlencoded({ extended: true }));
app.use(bodyParser.json());

// create a Router
const router = express.Router();

// example of a GET method that returns a simple "Hello World"
router.get('/', (req, res) => {
  res.send( "HELLO WORLD" );
});

// define the router to use
app.use('/', router);

// start express
app.listen(port, function() {
    console.log("Runnning on " + port);
});

module.exports = app;
4. Starting our server
Finally, start your webserver by running
nodemon index.js
You can now access the page returned by your web-server via the following URL:
localhost:3001
You should see the “Hello World” text returned by your server! Well done!
Now it’s time to add more routes to your Router with the following functions:
TLDR; be sure that your node is using the additional storage to write the blockchain data there
As Enter Elastos we are running 3 Elastos supernodes (Titan, Ganymede and Callisto). To have a better overview of the ecosystem and be ready in case of issue we decided to use different approaches to run the different supernodes. There are 3 approaches available to run a supernode: docker, debian packages and binaries. Titan was running the node based on the binary approach. Yesterday, our server was complaining about not having enough space which resulted in the supernode going down and its status changing to inactive. Although an additional 100 GB of SSD was mounted, the system wasn’t using it. So, what happened?
If your run a supernode with the debian package approach, the blockchain data is written to the /data folder, and that’s where our additional SSD was mounted. However, if you use the binary approach, the data is saved to a relative path from where you run the node and not seeing the additional storage (if you have mounted it to /data).
What should you do in such situation?
1. If you are using the debian package approach
1.1. Format (before running the node) and mount the additional SSD to /data. Your SSD should be called /dev/xvdb, you can check with the following command:
lsblk
If you see /dev/xvdb in the list just continue the steps as follow, otherwise adapt the name of your additional storage in the following commands.
2.1. Format (before running the node) and mount the additional SSD to /home/ubuntu/supernode as an example. Your SSD should be called /dev/xvdb, you can check with the following command:
lsblk
If you see /dev/xvdb in the list just continue the steps as follow, otherwise adapt the name of your additional storage in the following commands. In the example below we will be running the node from the /home/ubuntu/supernode.
If your supernode was already running and you are facing the same issue, here is what to do: 1. Stop all the running service (ela, did, token and carrier) 2. Mount your additional storage and move all the data there 3. Restart all the services from the new location 4. Create a new activation transaction
You should see your supernode coming back to life in a few minutes!
My main mistake here was not to check where the data was written to. As the REST API was working properly and the node was running fine I didn’t check the data/chain folder where the blockcahin is saved to. I just guessed it was all fine, it wasn’t, but now it is 🙂
I would like to thank Song (@songsjun) and his amazing team/colleagues that took their time to help me on a Sunday, as well as KP (@pachhaisaab) for putting all this information online and sharing his knowledge with the community. I am also somehow happy that this issue happened now (no penalty period) so that we are aware of it in case it happens to any other supernode.
Controlling the appearance of the keyboard is a big headache for mobile app developers. The keyboard should appear smoothly and fit in the user interface without blocking any element. Several solutions exist in React Native to deal with that issue: one can use the KeyboardAvoidingView component or one of the several npm packages that are doing the work for you. Finally, it is also possible to manually take care of the user interface adaptation to the keyboard appearance.
In this tutorial, we will create a simple view that requires user input (thus keyboard appearance) and that will adapt its component sizes/positions based on the keyboard visibility. We will create a simple view asking the user to fill in the 12 secret words to access a cryptocurrency wallet, the mnemonic. Once the user has provided the mnemonic, the keyboard will disappear and the view components will adapt to their new positions/sizes.
So let’s get started.
1. Create a new React Native app
Open your terminal and run the following command to create a new React Native project:
react-native init enterMnemonicView
2. The code
Contrary to the other tutorials, I am giving the whole code here at once first and we’ll go to the details below. Go to your newly created React Native project and open the App.js file, remove its content and add the one below:
The first part of the code is taking care of the keyboard appearance. The code needs to be aware of the keyboard visibility to adapt the view accordingly, that’s why we need to instantiate and implement our listeners.
We instantiate our listeners and tell React Native to take care of them at mount and unmount as follow:
We can now check when the keyboard appears/disappears and therefore control the interface according to the visibility of the keyboard. On the render() function we adapted our main View to have some position related values defined in the local state (see L.119 for an example), so that we can play with them. We can now change these values according to the visibility of the keyboard using this.setState() function.
// fired when keybord appears
keyboardDidShow (e) {
  let newSize = e.endCoordinates.height
  LayoutAnimation.configureNext(LayoutAnimation.Presets.easeInEaseOut)
  // adapt component positions by updating the local state values
  this.setState({
    marginTopMenu: 0,
    marginTop: 50,
    topHeight: 100,
    marginBottom: newSize
  })
}

// fired when keyboard disappears
keyboardDidHide (e) {
  LayoutAnimation.configureNext(LayoutAnimation.Presets.easeInEaseOut)
  // adapt component positions by updating the local state values
  this.setState({
    marginTopMenu: 100,
    marginTop: 100,
    topHeight: 150,
  })
}
In the end the whole process looks like the image below:
The whole source code is also available on GitHub.
The definition of linting on Wikipedia is pretty clear :”Lint, or a linter, is a tool that analyzes source code to flag programming errors, bugs, stylistic errors, and suspicious constructs”.
By using a linter in your React Native project you’ll be able to catch code errors early on and correct them before it’s too late. For a React Native project, we will rely on ESLint, and this is how we are going to do it:
1. Install the linter plugin for your IDE
I am using VSCode and a great Linter plugin is ESLint. There are usually several plugin alternatives for the most common IDEs, go and grab your favorite.
2. Install ESLint
The eslint package is the tool that will check for errors in our code. Open the command line, switch to your React Native project folder and run:
npm install eslint --save-dev
3. Install the Babel parser
We need the Babel parser to allow ESLint to check for code written using the ES7 syntax, Flow or TypeScript types.
npm install babel-eslint --save-dev
4. Get a list of rules for ESLint
For ESLint to properly work we need to configure ESLint with a list of rules. You can write the instructions yourself but there are already existing solutions, so we will just pick one of them.
Here are a few: Airbnb JavaScript Style Guide() { ESLint-plugin-React ESLint plugin for React Native
We will continue with the esling-plugin-react-native. To install it, run:
npm install eslint-plugin-react-native --save-dev
5. Add the .eslintrc file to your project
To configure ESLint we need to create a .eslintrc file at the root of the project. Open your text editor and add the following to your .eslintrc file:
As soon as you save your .eslintrc file, you should see a lot of errors showing up in your code. No worries, these are probably some styling or import related issues, go ahead and fix them. You can now enjoy you clean code😉
There are already several tutorials of that kind available on the Internet. However, I couldn’t follow any of them from the begining to the end without issues, so here is my own tutorial about how to write and compile your very first smart contract for the Ethereum blockchain. This first article is all about the Dapp code and compiling, a second article about how to deploy our app on the network will follow.
A smart contract corresponds to code instructions that are supposed to run on the network. In the case of Ethereum, a runtime environment called EVM (Ethereum Virtual Machine) takes care of running smart contracts. The instructions of the smart contract are written using the Solidity programming language. There are 2 essential steps to successfully run a smart contract on the network: compiling and deploying. Compiling the smart contract will generate a bitcode that can be later deployed on the network. So, let’s get ready to write our first smart contract!
Required tools
The only tools that you need to follow this tutorial are Node.js and npm installed in your machine.
1. Initialize a new node project
Open your terminal and create a new package.json using the npm command line tool:
npm init helloWorldContract
Confirm all the steps by pressing Enter or adapt the answers if needed. This will create a new package.json file containing all the information provided above.
2. Install solc
The npm solc package is a JavaScript library for the solidity compiler. We will use the solc package to compile our smart contract so that it is ready to be deployed on the network.
npm i solc
3. Write the smart contract
The next step is to write our smart contract. There are several essential points to write a smart contract properly:
a smart contract always starts with the “pragma solidity ^0.5.2;” definition, where 0.5.2 is the version of the Solidity compiler
a smart contract is defined by the “contract” keyword followed by its name
a list of variables and functions defines what the smart contract is meant to do
Copy paste the code below to your text editor and save the file as Hello.sol
pragma solidity ^0.5.2;
contract HelloWorld {
    uint256 counter = 5;
    function increment() public {
        counter++;
    }
    function decrement() public {
        counter--;
    }
}
In this example we declared a counter variable of type uint256 and initialized it to 5. We then defined 2 functions in our smart contract; the first one to increment our counter and the second one to decrement it.
4. Write the compiler code
We now need to write the JavaScript code that will compile our smart contract. Create a new file, save it as compileSol.js and add the following code to it
This is what we will need to publish our smart contract to the network. I will explain more in details about how to publish the contract on the network in the next blogpost of the series.
React-Native allows user to create bridges to access native code from JavaScript. Once you have created your own bridges you might want to share them with the community. This article will explain in a few simple steps how to do so.
1. Create a new project with react-native-create-library
This will create a new project name react-native-native-bridge with all the required files in there.
2. Implement your bridge
Open the Xcode project located in the react-native-native-bridge/ios folder and edit the RNNativeBridge.m file to add your bridge functions accordingly. Here is a simple example that will return “Hello from Xcode!” when called in React-Native
RCT_EXPORT_METHOD(greetings: (RCTResponseSenderBlock)callback){
    callback(@[[NSNull null], @"Hello from Xcode!" ]);
}
If you are not familiar with native modules, go check the great documentation here.
3. Create a new npm package and publish it
Now that our hyper sophisticated bridge library is ready😉, we will propose it as an npm package on npmjs. You first need to create a new account on npmjs if you don’t have one yet. You can run
npm whoami
to check if you are logged in or not. If not, just run
npm adduser
and follow the instructions. Update the package.json file accordingly and run
4. Create a new React-Native demo app and use the package
Let’s create a new React Native project to test the npm package. Open your terminal and run
react-native init nativeBridgeTest
Install the react-native-native-bridge package and link it
npm install react-native-native-bridge
react-native link react-native-native-bridge
Open the App.js file of your React Native project and edit as follow
import RNNative Bridge from react-native-native-bridge
...
// create a new function in the App class
greetings = () => {
    RNNativeBridge.greetings( (err, res) => {
        console.log(res);
    });
}
...
// Add a button in the render() function that will call the native function when clicked
<Button title="Greetings" onPress={this.greetings} />
This should print “Hello from Xcode!” in the logs.
At the QRL we are dealing a lot with hexstrings. Several of our API functions return results in hexstring format and it is sometimes important to be able to reuse them for another call. Here is how to convert a hexstring you received as NSData object (and looks like <24501f40 6cf57975 676b6d34 95d4cd7d 14541ddd 4d44fa4a f08e6faf 9d15252b>) to a string (in our case “24501f406cf57975676b6d3495d4cd7d14541ddd4d44fa4af08e6faf9d15252b”):
NSData *data = YOUR_NSDATA_HEXSTRING;
// we first need to get the length of our hexstring
// data.lenght returns the lenght in bytes, so we *2 to get as hexstring
NSUInteger capacity = data.length * 2;
// Create a new NSMutableString with the correct lenght
NSMutableString *mutableString = [NSMutableString stringWithCapacity:capacity];
// get the bytes of data to be able to loop through it
const unsigned char *buf = (const unsigned char*) [data bytes];

NSInteger t;
for (t=0; t<data.length; ++t) {
  NSLog(@"GLYPH at t : %c", buf[t]);
  NSLog(@"DECIMAL at t  : %lu", (NSUInteger)buf[t]);
  // "%02X" will append a 0 if the value is less than 2 digits (i.e. 4 becomes 04)
  [mutableString appendFormat:@"%02X", (NSUInteger)buf[t]];
}
NSLog(@"Hexstring: %@", mutableString);
// save as NSString
NSString * hexstring =mutableString;
You can check the decimal, hex and corresponding glyph here.